HubSpot Flywheel for Unlocking Customer-Centric Growth
Discover how the HubSpot Flywheel can transform your business by focusing on continuous customer engagement and satisfaction.
.png?format=webp&width=700&height=500&name=A%20(13).png)
Identifying the best use cases of HubSpot lifecycle stages to effectively manage and track, contacts and companies in HubSpot.
When it comes to effectively managing your customer relationships, understanding where each contact or company stands in its journey is crucial. This is where lifecycle stages come into play. HubSpot Lifecycle Stages provide businesses with a structured approach to categorize their contacts or companies based on their interaction and position in the funnel. By effectively utilizing these stages, marketers can create targeted strategies, nurture leads more efficiently, and ultimately, drive growth.
Given below are the 7 common HubSpot Lifecycle stages and when they should be used:

A contact or company who signed up for your newsletter or blog is a subscriber. The lifecycle stage begins when the contact subscribes to your newsletter sign-up form and has opted to receive communications from your business.
These contacts/companies are usually new and require solid convincing to move through the funnel.
A lead is a contact or company from any of the offline or online sources. For instance, an online lead could be someone who fills out a consultation form and an offline contact could be someone who syncs from an email account.
For most companies, the "Lead" lifecycle stage acts as a starting point of the sales pipeline and the default life-cycle stage.
As the name suggests, MQL are the leads that exhibit certain traits or behaviors that suggest potential interest in the company's offerings. In most cases, they require further evaluation and nurturing before being sent to sales for more direct engagement.
The lifecycle stage begins when the lead aligns with or closely resembles the predetermined criteria of the buyer persona. This may include factors like demographics, industry, and other requirements that qualify the lead as a suitable match.
SQL (Sales Qualified Leads) are leads that have been qualified by the marketing team and are considered suitable for engagement by the sales team. These leads exhibit a greater level of interest, engagement, or likelihood to make purchase decisions.
The SQL lifecycle stage starts when a contact or company interacts/engages with the marketing team's nurturing campaigns, such as scheduling an appointment, booking a demo, visiting a transactional page, or scoring higher on custom lead scoring criteria, etc.
The opportunity life-cycle stage refers to a contact or company record with at least one deal associated with HubSpot. If you have configured the default settings for deal stage automation, creating the deal against the contact or company will automatically set it to opportunity.
This life-cycle stage represents that the contact or company has an opportunity to have a discussion and make a potential business transaction.
A customer is a contact or company having a record of closing at least one deal. The lifecycle stage is selected automatically when a contact or company with a prior associated deal is closed and declared closed-won in the HubSpot record.
A customer who recommended your organization to someone is viewed as an evangelist. The lifecycle stage begins manually whenever a customer refers your business to a colleague or friend based on their experience.
The following use cases can help you understand how HubSpot Lifecycle stages can be used in different scenarios:
With HubSpot's lifecycle stages, you can segment contacts based on their journey with your organization in HubSpot. Segmenting contacts into distinct stages like leads, SQLs, and customers allows you to precisely target your communication and strategy.
Examples: Contacts who are currently in the "Opportunity" stage and have expressed interest in a specific service can be segmented accordingly. This increases the likelihood of conversion by sending them targeted content and offers for that particular service.
Similarly, creating a list by Identifying contacts in the "SQL" (Sales Qualified Lead) stage whose last activity date is more than 3 months ago can help us to set up a re-engagement campaign with customized incentives or content to encourage them to re-enter the buyer's journey.
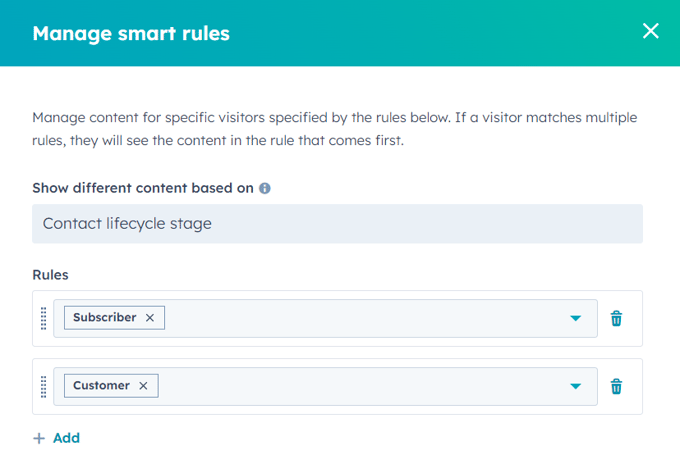
By segmenting your contacts according to where they are in the lifecycle, you can create personalized messages, offers, and experiences that speak to each segment's unique needs, interests, and behaviors. Smart content feature is dynamic, context-aware content that changes based on the attributes, actions, and preferences of the viewer. HubSpot lifecycle stages can be integrated to make the content that adapts to a contact's stage.
Example: Smart rules can be added to the content modules. For instance, visitors in the "Subscriber" stage may see a call to action to download an introductory eBook, while those in the "MQL" stage, on the other hand, might be shown a "Schedule Demo" button.
Automating workflows based on HubSpot's Lifecycle stages helps companies streamline their marketing and sales efforts and make them more efficient. Businesses can automate targeted communications by creating workflows based on lifecycle stages.
Example: When a contact converts from an opportunity to a customer stage, automated workflows can trigger personalized welcome emails and onboarding sequences.
HubSpot Lifecycle stages can be used for accurate sales forecasting and business planning. Businesses can forecast future conversion, sales, and customer acquisition costs by monitoring the movement of contacts from one stage to the next. This data-driven strategy aids in resource allocation, more precise forecasting, and the identification of potential bottlenecks or areas for development in the sales and marketing processes.
Example: Businesses can calculate the conversion rates between stages by analyzing the historical progression of leads through each stage. For instance, if you are aware that 30% of Marketing Qualified Leads (MQLs) typically convert into Sales Qualified Leads (SQLs) along with the average time to convert from MQL to SQL, you can predict how many SQLs to expect in the upcoming months based on the volume of incoming MQLs.
HubSpot Lifecycle stages are essential for accurate reporting and insightful evaluation. Businesses can create performance dashboard reports that provide a thorough insight into conversion rates, lead quality, and sales trends by tracking contacts' movement through different stages.
Example: Monitoring the lead-to-opportunity ratio can provide a clear conversion rate, whilst assessing the time it takes for contacts to go from one stage to the next may indicate bottlenecks or places for improvement in the sales process.

Ad campaigns can be optimized by utilizing the HubSpot lifecycle stages. Businesses that properly categorize their leads into MQLs and SQLs will benefit the most from evaluating conversions using metrics such as Cost per Marketing Qualified Lead (MQL) and Cost per Sales Qualified Lead (SQL). These metrics support marketers in assessing lead quality and ad spend effectiveness at various stages of the customer journey. Businesses can determine campaign effectiveness in generating engaged leads by tracking MQLs and SQLs generated through advertising and calculating cost per MQL and SQL.
Step 1 - In the HubSpot account, click on the gear icon (settings) located in the main menu bar.
Step 2 - From the menu on the left, go to "Objects," then select "Contacts".
Step 3 - Click on the tab labeled "Lifecycle Stage."
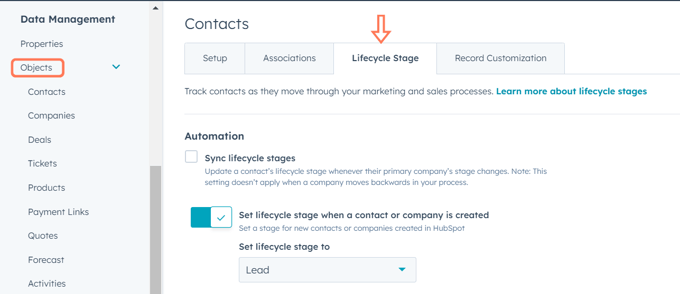
Step 4 - To create a new lifecycle stage, press the "Add stage" button. On the right-hand side, provide a name for the stage, and click "Create lifecycle stage" to confirm.
Step 5 - To change the order of the stages, use the handle (drag handle) and drag a stage to a different position.
Step 6 - Hover over a stage and select "Edit." In the panel on the right, modify the stage name, and then confirm changes by clicking "Edit lifecycle stage". If needed, you can click the code icon to see the internal ID used for integrations and APIs.
Step 7 - Hover over a stage and click "Delete". If the stage contains data or is utilized in other HubSpot tools, you'll need to move the data to a new stage and/or remove references from HubSpot tools. A stage used as a default for connected apps cannot be deleted.
Step 8 - To see where a particular lifecycle stage is being used, click on the number in the "Used in'' column. In the right-side panel, click "View all [object/tool]" to access records or tools (like lists, reports, and saved views) where the stage is used.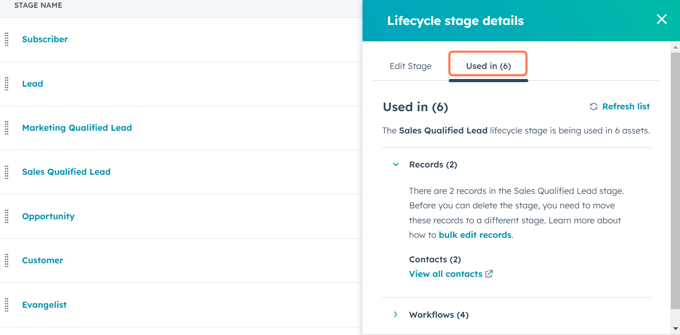
Step 9 - When finished, click "Save" at the bottom left. Your custom stage will be available as a choice when editing the Lifecycle stage property of a contact or company.
Although the lifecycle stage can be set according to the newly created record or its associations, you also have the option to manually change the Lifecycle stage property or use an alternative tool within your HubSpot account. To update the Lifecycle stage property, you can perform the following actions:
Navigate to your records:
Step 1 - Click the name of a record.

Step 2 - In the left panel, About section, click a property to edit and select or enter a property value.
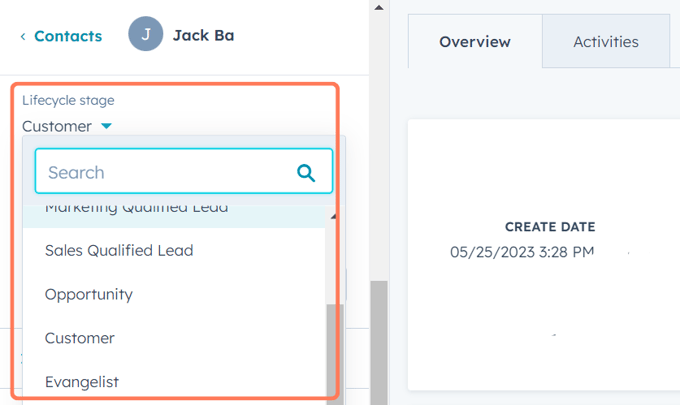
Step 3 - Once you're done, click "Save".
Navigate to your records (contacts/companies):
Step 1 - Select the records you want to update. You can apply a view to filter the records you wish to edit.
Step 2 - For selecting multiple individual records:

Step 4 - Edit: Click Edit to edit the values of a Lifecycle stage property within these records. You can also directly edit property values within the table.
Go to Automation > Workflows in your HubSpot account.
Click Create Workflow in the upper right corner.
Select Start from Scratch and then click Create Workflow.
Choose Contact-based or Company-based in the left panel, depending on which records you want to update the Lifecycle stage for.
To include a workflow action, click the addition (+) sign.
To advance a lifecycle stage:
Choose Set property value in the right panel.
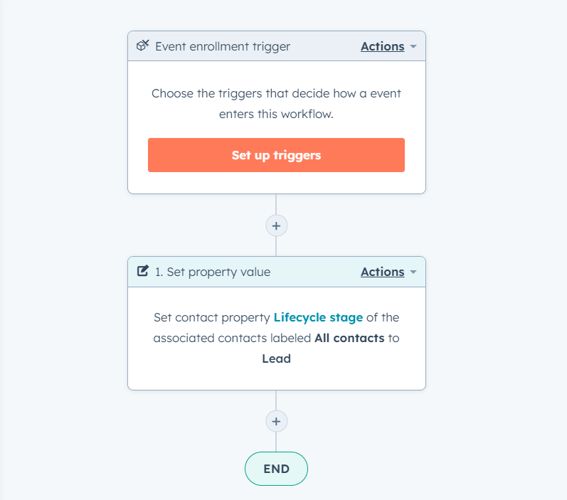
Choose Contact or Company from the drop-down menu after clicking the Target property type.
Select the Lifecycle stage from the Property to Set dropdown menu. Next, choose the lifecycle stage value you want to give your data from the Lifecycle stage dropdown menu.
Press Save.
HubSpot Lifecycle stages provide an organized structure to help organizations manage interactions with customers and streamline their strategies. By categorizing contacts and companies into distinct lifecycle stages based on their engagement level and readiness to convert, HubSpot empowers businesses to nurture leads, engage in targeted communication, and achieve other meaningful outcomes. This HubSpot feature is not limited to streamlining marketing and sales efforts but also contributes to enhancing customer experience by delivering relevant content and solutions at the right time.

Discover how the HubSpot Flywheel can transform your business by focusing on continuous customer engagement and satisfaction.

Explore the potential of HubSpot for B2C to increase sales and growth. Discover compatibility, features, and real-world use cases for informed...

Discover how HubSpot for manufacturing firms can supercharge your ROI. Explore real-world examples and limitations for manufacturing firms using...